Skills Exercise #4 / Shauntelle Hixson

For my design project I decided to do a website logo and banner. I wanted to use this opportunity to create something cool to go along with my final project.

I started off by brainstorming ideas of what I wanted it to look like. I wanted to do something original and something that represented me. I’m not an awesome drawer, but I’m not horrible either, so I decided to sketch some ideas out and ended up with this one.
Shauntelle Drawn Logo

I thought this was pretty cool and it was also really simple and I knew I could manipulate it more on Photoshop without having to lose my mind too much.

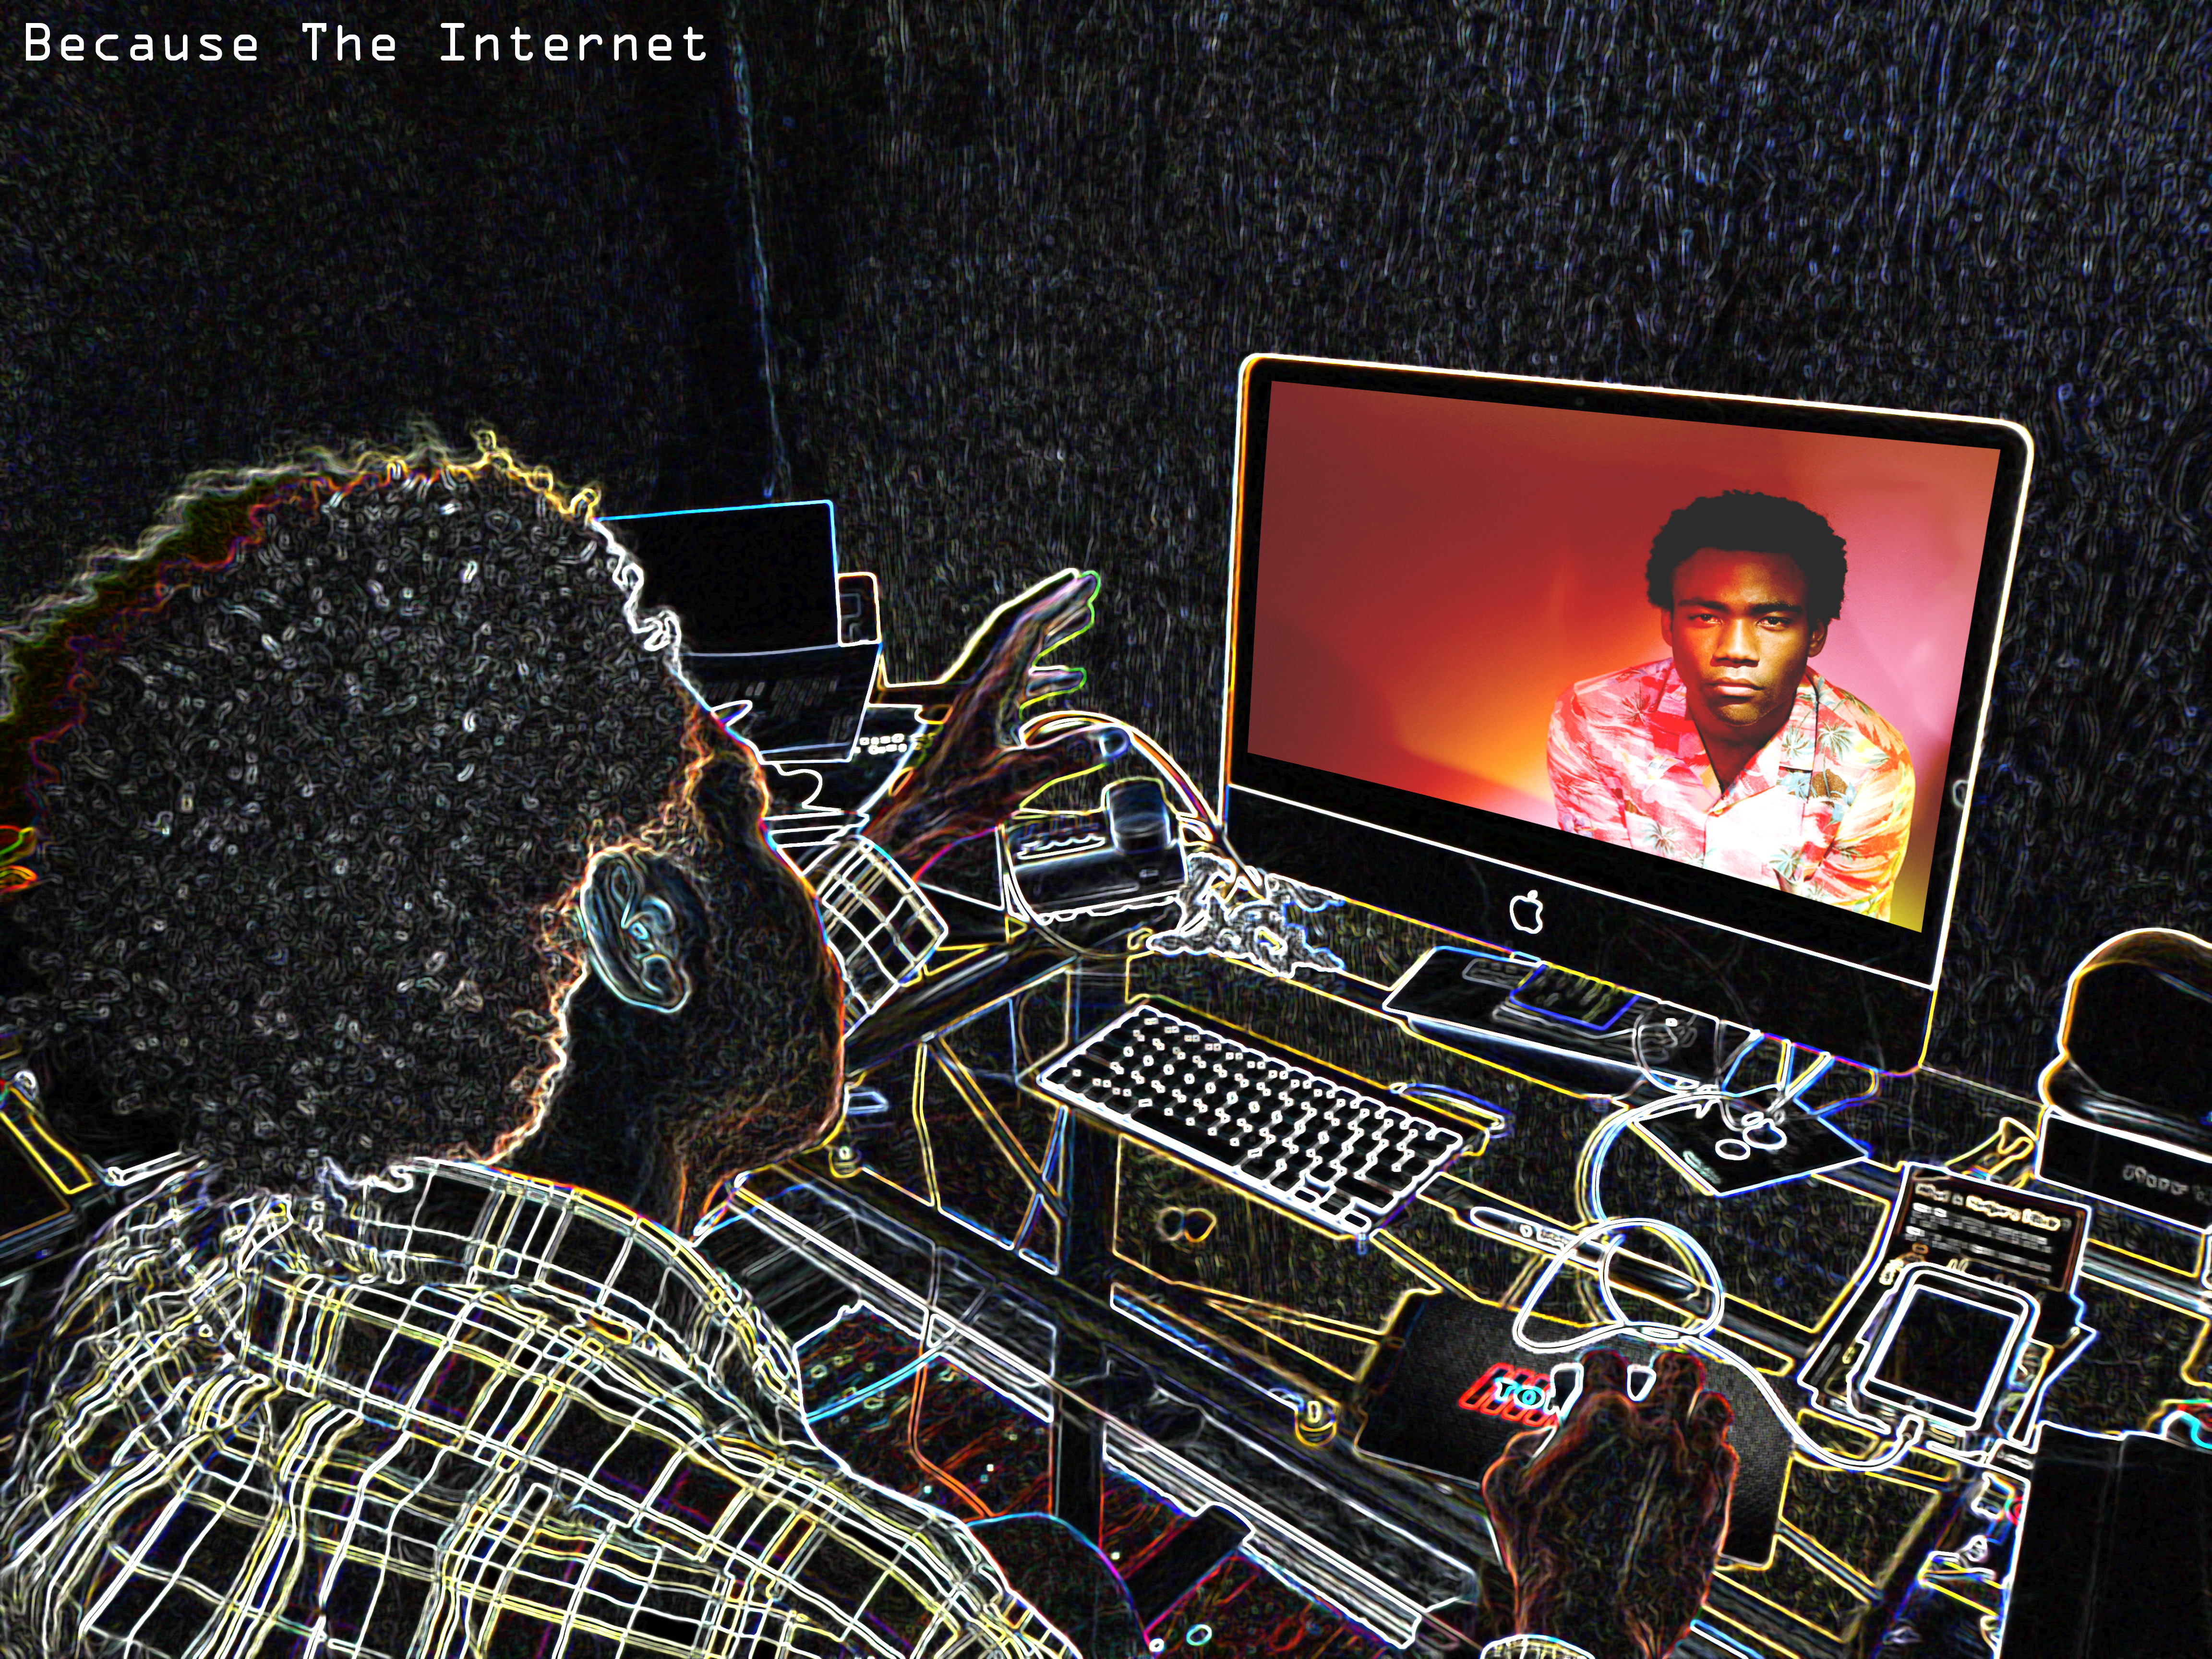
After drawing the picture I scanned it and opened it up in Photoshop. I was able to delete the white background and just capture what I had drawn. Some of the black lines had white specks in it so I had to use the painting tool to cover up those black spots. From there, I duplicated that layer and began to mess with the fx button to alter the way the picture looked. There are so many options so I spent a good amount of time messing with the effects and seeing which one I liked the most.

After that I knew I wanted some font to put my name underneath. I didn’t like any of the font that Photoshop had so I went online to look up some font I could download. I went to website called Cool Text to find the font. It was easy to put the font in the picture and I also used the fx button to add some graphics to it.

Below are the 2 logos I made, one with all purple (which is my favorite color if you didn’t notice) and one with black hair.
Shauntelle Logo Black Shauntelle Logo Purple

After making the logo I decided to go ahead and do a banner, and I did it the size of a Facebook cover photo. I scaled down the picture and the font to a certain size as well and used the fx button for both. Here are the results:

Shauntelle Banner BlackShauntelle Banner Purple

I really enjoyed this project and I’m getting less frustrated with Photoshop as I learn it more. It’s just a matter of remembering steps and not rushing or I’ll completely mess something up. I’m not completely sold on my final product, I might continue to tweak it some more in Photoshop and see what else I’m able to produce!

Skills Exercise #4 / Laine Davis

The Task

For the design exercise, I chose to do the Website Banner assignment because I thought it would be a useful step in creating my final project, 08.29.05.

The banner assignment states: “Similar to the Website logo, create your own website banner! This will go on your website like your featured image. Have fun with this and be creative!”

My Mission

For my final project, I do not want a logo per se, but I would like to have various large images/banners on the different pages to represent different aspects of the project. Therefore, I brainstormed a little, trying to figure out what I wanted the images to look like. I decided I wanted a collage type photo, but without the harsh edges between the individual images. After using Creative Commons to find images, I went looking for a tutorial on how to blend images in Photoshop. This tutorial was perfect.

Though the tutorial was very helpful, I had a little difficulty using the gradient tool because it kept causing the images to fade into a transparent background instead of the neighboring image. After watching that part of the tutorial again, I realized the importance of overlapping the images quite a bit to prevent this. Once I fixed that, it was very simple and fun!

The Products

For the first picture, I wanted to start with a broad overview of the flooding that transitioned to focusing on the Superdome and ended on the people inside the dome. This is how it turned out:
katrina

Pleased with how the first one turned out, I decided to make a couple more. For picture number two, I chose to focus on the rescue efforts during and after the storm. Results:

katrina rescue

For the last one, I wanted to focus on the wetlands since my site will also include facts about the importance of wetlands and their role during hurricanes. This is how it turned out:

wetlands

Conclusion

Overall, I really enjoyed creating these and after the first one, it became very easy and natural. Now, I have another useful tool in Photoshop to help me in any future projects.

Skills Exercise #4 – Monica Chapman

For the Design Exercise, I decided to try the Movie Book Cover Challenge. I am a fan of John Hughes movies especially Ferris Bueller’s Day off. So I wanted to try to make a book cover for my favorite movie. I decided to try Photoshop for this challenge since I knew I would be editing pictures. The main part of this challenge was that you couldn’t use the faces of the actors that are in the movie. So the question I asked myself was what pictures can I use on the cover?

A lot of people when looking for books truly judge a book by it’s cover. Some people like simple covers while others like very detailed ones. Since I like writing realistic stories especially about young adults and teens, I decided to go for a more minimal approach to the design of the book cover.

MV5BMTg2MTUxODY4NV5BMl5BanBnXkFtZTcwNzQ5NzU2OQ@@._V1_SX640_SY720_

Most of John Hughes’ movie posters were images of the main actors in the movie. So basing the book cover off of the movie poster was out of the question. My next idea was to think of the movie plot. If you don’t know what Ferris Bueller is about then let me give you a quick summary. Ferris Bueller decides to take a day off from high school and drag his girlfriend and best friend on a day out on the town in Chicago. It’s a fun and crazy movie full of Chicago landmarks and memorable scenes. Yet there are always three things I always remember about the movie: The history teacher calling Bueller’s name, The parade scene, and Cameron’s father’s 1961 Ferrari. The car plays a very important part in the movie. So I decided to use the car as the main image of the book cover.

Ferris Book Cover

I first found a picture of the Ferrari model that was used in the movie and edit out the background so that only the car was left. Here is the original picture.

Screen Shot 2014-10-18 at 4.27.24 PM

After that, I used a 600×800 size template for the book cover and used Arial Font for the words. I had fun doing this book cover and wanted to try out two of my other favorite John Hughes’ films. I did the same thing I did with Ferris Bueller in terms of images that are important in the movie to use for my book covers. Here is what I came up with:

Breakfast Club Sixteen Candles

Final Thoughts: I’m not the best at designing. So taking on this challenge was not only fun but challenging. I really wanted to think about if this would catch not only my eye but someone’s else as well. Not being able to use the actor’s was hard but it gave me a chance to really think about what would work on a book cover and what wouldn’t. For the Bueller book cover, I tried to make “Save Ferris” buttons but they didn’t come out very well. And I also tried to use the Chicago sky line but felt that was too boring and predicable to use. Designing anything at the end of the day is hard because there is a whole thought process behind it. And even though I used Photoshop, I found an interesting tutorial where you can make book covers using MS Word.

The

Skills Exercise #3 / Shauntelle Hixson

The idea of fan fiction is completely foreign to me so I decided to do the Fan Fiction Picture assignment.

I decided to recreate the title of an album, Childish Gambino’s Because The Internet to be exact. I had a clear picture in my mind of what I wanted the end product to look like and figured that I would try my hand at Photoshop again for this assignment.

I started this project by taking a picture of my husband sitting at his desk. He did a bunch of different poses and I chose one that I liked. After that I imported the picture into Photoshop and began to figure out how I was going to make the picture look like how I envisioned it.

First I knew that I wanted to make our blank computer screen into Childish Gambino’s actual album cover. To do this I imported the picture into Photoshop and began to use the transform option to actually make it fit into the screen, I used this tutorial to figure out how to bend the picture. This was done in its own layer in Photoshop and the process was somewhat tedious. At one point I felt like the tool wasn’t working correctly so I ended up closing down Photoshop and starting it again. It ended up working the way it should when I did that (not sure what that was about).

After getting the album cover into the actual computer screen, I decided to mess around with the filters on Photoshop. There were more than enough choices for me to choose from and I had fun messing around with the different ones. I ended up making 3 different versions.

Because The Internet 1 Final Because The Internet 2 Because The Internet 3I’m really happy with the outcome and it became what I envisioned in my mind. I think I have a love/hate relationship with Photoshop. The process of learning it can be frustrating and time consuming, but once you are able to see what you can create, it becomes exciting and addicting. I could have messed around with those filters for hours!

Skills Exercise 3 / Nicole Wong

For this assignment, I chose to create a mashup. I wanted to attempt a project using programs where I had little to no experience, even if it would take a laborious late night and presumably lots of cursing.

I decided to do the Movie Mashup assignment.

mashup project her

I love Arrested Development. It’s one of the first shows I have almost thoroughly memorized through binge watching repeatedly. I used Photoshop for this poster. Overlaying Jason Bateman’s (or Michael Bluth’s) face over Joaquin Phoenix’s head was the easy part using this tutorial. Using the lasso tool, I steadily clicked around Jason Bateman’s face from a Identity Thief poster. Then, I adjusted the feather radius to 10 pixels to make up for my somewhat shaky lasso-ing, and copy/pasted to Spike Jonze’s famous Her poster featuring a contemplative Joaquin. I then added a “?”.

The difficult part was matching the lighting. Her has a matte, flat aesthetic. Identity Thief used a much brighter light source. I tried toning down the shine apparent on Jason Bateman’s face through Filter > Render > Lighting Effects and then sliding back on exposure, intensity, and gloss, but it still looks obvious that the light sources aren’t nearly similar.

That was a relatively simple project that echoed back to the first assignment I did mashing two images together. Feeling inspired to create through another medium, I decided to make a movie trailer.

https://vimeo.com/106467610

I was definitely not ready to see if I could challenge myself to a crash course in Premiere. Instead, I used Windows Movie Maker. It was easy to use for this kind of project.  I had scenes in mind I wanted to use for this trailer, but how would I get them as separate video files?

There is a hack for downloading Youtube videos simply by writing “pwn” in the URL. It directs you to another website with download URL links. You can also choose to download audio MP3s.

I found clips from “Arrested Development” (this 8:09 supercut was the most helpful), wrote down the start times/stop times for each time George, GOB, Lucille, and Michael use “her?,” and clipped the Youtube video using Windows Movie Maker. That process probably took around 1 hour trying to cut those scenes correctly. Then I found clips from Her and spliced those before the Bluths.

The titles were the oddest to manage in Windows Movie Maker. I felt like they consistently would change to another running time setting or extend the title much longer than it should. It would make the pacing off by being a visual awkward pause. The effects didn’t help either – they looked gimmicky or like a forced Powerpoint flair. To remedy that slightly, Windows Movie Maker has the option to add music and adjust them to where you want in the movie.

her process her process 2

From the Free Music Archive, I found a song called “Cylinder One” by Chris Zabriske. Through the search function, you can search for songs based on tempo, mood, public domain, allowed to use for commercial/remix purposes, and other  filters. However, for Arrested Development’s segment, nothing quite matched their distinct, peppy soundtrack. no matter the positive mood filter I set.

I have long used a site called Listen to Youtube as a song ripper. This upload of the background music worked best. I now had an MP3 file to put into my trailer.

For amateur video projects, Windows Movie Maker worked. It had effects similar to Powerpoint and WordArt, so I kept it a bit bare. The music editing was difficult to adjust its volume. As far as making simple clips, it was successful. If you need to cut scenes together in a pinch, Movie Maker can do that. Save the titles and effects for Premiere or something more sophisticated. In total, this project took me 4 hours to complete.

Skill Exercise #1 || Monica Chapman

I have been playing with Photoshop for a number of years learning how to make GIFs and playing with photos. I’m still trying to figure out how to sharpen and use some other functions. So when we were given this image assignment, I wanted to try something that would help me understand Photoshop further. 

Focus On One Color

When I took Photography classes years ago, our teacher had us take black and white pictures and paint certain colors on them to highlight certain parts of the picture. When I learned that you can do something similar on Photoshop, I was very excited to learn. When looking through the Assignment Bank, I found one that will help me learn more about Focusing on one color on Photoshop

As it says in the title, the goal is to focus on one color in any room of your house. I decided do this assignment a little bit differently by focusing on one object and have the room in the background

Picture Project 1


I wanted to first have a central color to focus on. I decided to turn the focus on my mom’s birthday flowers. My next step was to try and find a way to make sure there was enough light to coming into the room so that the room and the flowers can be seen. After taking the picture, I realized that the picture was a little fuzzy. In order to make sure the final picture came out nicely, I tried to make sure that the flowers came out sharper so I found a tutorial on sharpening images

Picture Project 1 part 2


My next step was to then turn the image into a black and white image. I followed the steps to a splash of color tutorial to turn the picture black and white. However, I needed to make sure the flowers’ colors came through. According to the tutorial, you had to make two copies of the picture. The next step was to turn the first layer into black and white by pressing the Black and White button. Then, you click the second layer and start erasing all the color in the picture except the sections you wanted. In my case, it was the flowers. Here is my final result:

Picture Project 1 part 3

My Final Thoughts

Overall, it took me about an hour and a half to complete everything. And after going through this assignment, I found that Photoshop was very helpful and also easy to use in regards to this project. I’m still pretty unfamiliar with Photoshop and the different ways I can use it however, I found that doing different task and challenges such as this one helped me understand the basics a little bit more. The erasing part was a little hard when it came to making sure I didn’t erase the roses. Here are some tips for erasing photos like this:

  • Use the magic eraser option to eliminate huge chunks of the same area. This process can make things easier when it comes to erasing.
  • If magic eraser is taking too long, change the size of the eraser to a bigger size. When you do this, you can erase the parts you don’t want in color faster. Watch carefully that you are not taking out the parts you want out of the picture.
  • When it comes to erasing the smaller and harder areas, zoom into the parts you are trying to get and make sure to decrease the size of the eraser. 
  • Make sure the hardness of the eraser is set to 100% or else when you erase, if will become blurry.

If you would like a more in depth video tutorial on Color Splashing, I recommend watching this video


Skills Exercise #1 / Palak Shukla

When given this assignment, I was both nervous and excited. Nervous because I have the most BASIC knowledge of photo editing. I have basically just played around with Brightness and Contrast and when I feel courageous, I sometimes add a Sepia or Gray-scale filter. Excited because I now have the opportunity to explore and challenge my skills

Mother ship calling me home…

I decided to begin with the most known and admired photo editing software – Photoshop!! I have always been fascinated with the ease and skill with which people work their way through Photoshop – churning out masterpiece after masterpiece. I have absolutely no knowledge of the software, except for the fact that it exists.

I started by downloading a trial version of Photoshop. I will ultimately buy it, but for the purposes of this exercise, I decided to try my hand at the trial.

So-Many-Choices!!

My next step was to explore the different editing features available on Photoshop. And man oh man!! The possibilities seemed endless. I was able to find two sites that talk about the best editing features of the software.

51 Free Photoshop Tutorials for Amazingly Cool Photo Editing

25 Photo Editing Tutorials for Photoshop

I spent over 2 hours, just going through the countless options available, and exploring all the different tutorials on these awesome links.

Time to make a decision. 

Although it was really tough, I finally decided that the one feature that always fascinated me was the way two photos were merged to make one beautiful end product. Many a times, I click a photo, and wish that the background was different or more captivating. This was my chance to experiment.

For my subject, I decided to take this fabulous shot of Benny the Bull that my husband and I captured in a game last year.

Benny-_The_Bull

Thought of getting a little cheeky, and make it look like Benny is flying over New York city, using another great shot of NYC we got, on our vacation this summer.

NYC_Palak

This fabulous tutorial, taught me all there is know about how to merge the photos, change contrast, change opacity, mask the layers and edit the final product to make it look authentic.

But once I completed the image, the jpeg looked blurry and distorted. This one pager on how to save hi-res images, helped me achieve the below end product  – and I was quite pleased with the output

Final Attempt_Bull + NYC

Challenging myself a step further….

Considering it was my first attempt at Photoshop, it took me awhile to understand the different tools and functions, and the final product took a couple of trial and error attempts. But what is the fun without a little hard work. Having gotten a slight hang of the software, I decided to take it a little further, by making it look like this photo was a part of a breaking news story.

I started by downloading a NY Times Headlines Page. This was just basic Google search.

With the tutorial I learnt above, I was able to insert my jpeg onto the image, and change the background layer colors. But I was still struggling with adding the required text, to make it look like a real news story.

So I saved my file and reopened it. This made it a little easier. It was then that I came across these 3 useful blog posts:

How to Replace Text in Adobe Photoshop

Formatting paragraphs

YouTube video on how to edit text

The last one was strictly average. But the first and second, helped me achieve my end result. I was able to create a mock-up of a New York Times headlines with my edited image and text. This is what it looks like:

Final Attempt_Bull + NYC _ NY TImes.jpf

In conclusion

I feel I have come a long way from increasing the contrast of an image, and feeling like a graphic expert! I learnt multiple features of the Photoshop software, that I was unaware even existed. Of-course I know that this is just the tip of the iceberg, and Photoshop has A LOT more to offer. I am really looking forward to learning via this class, and my own research, to ultimately reach a point where I can add “Photoshop Pro” to my resume!

Skills Excercise #1 / Shauntelle Hixson

While looking through all of the options I decided that the Multiply Yourself exercise seemed the most exciting to me. I enjoy photography and there is a photographer named Derek Blanks that I have followed over the years that has used this technique. He used to do these “Alter Ego” photos with celebrities (click here if you are interested in seeing some of the pictures, just click on “Alter Ego”). I also knew this exercise was going to give me an opportunity to play with Photoshop which is something that I have on my computer, but have never used before.

My Thought Process

I knew that I wanted to make at least 4 clones of myself and at the last minute I decided to change different parts of my outfit because I thought it would make for a more interesting photo with a story. I was originally going to take the photos inside, but thought that taking it outside would give me more space so that the pictures hopefully didn’t overlap each other.

The Set Up

I set up the camera on a tripod so it wouldn’t shake and the background would be still. It wasn’t until I was outside that I realized that maybe this wouldn’t be the best option since I was battling the sun and had to deal with shadows and shading, but I went ahead with it anyway. I had my husband snap the pictures while I was rushing to get to my next position before the sun changed too much. It took about 10 minutes to take the pictures which I didn’t think was bad.

Research

After the pictures were taken I opened up Photoshop and started to look up tutorials on Google. I typed in “How to multiply yourself in Photoshop” and some videos popped up.

The first video I clicked on wasn’t too helpful for me and seemed like it was more for people who had at least a little bit of knowledge about Photoshop already.

The second video was better but it was still confusing to me.

The third video was what helped me to understand the whole process.

Trial and Error

After looking at the pictures I realized that I did have a shadow problem and on top of that, 1 of the poses I did was going to overlap into another pose. Instead of going outside to take pictures all over again, I decided to take on the challenge of making it look as realistic as possible.

1 2 3 4

It took me a while to understand how layering works in Photoshop. I kind of thought that if I just import the pictures they would automatically layer on top of each other and that was it. Nope! I realized that the first and second video tutorial had a different way of going about the process of multiplying yourself than the last one. Since the last video made the most sense to me I decided to try that way out first and ended up with this…

shauniecloned1In short, I imported the pictures into Photoshop (the first picture imported becomes the background image) and added a layer mask to all of the pictures except the background one. I used the pencil tool to outline the poses and erase everything around it. I had to zoom in to touch up some spots.

I thought this was good, but the second me from the left was really bothering me. It didn’t look realistic at all. I looked like I had been copied and pasted there. I believe that it turned out that way because I deleted my shadow by accident and had no idea how to recover it. I also think the order in which I layered the photos made a difference as well. I decided to start over and try the technique from the first and second videos I watched.

Final Product

The second time around I made sure to layer my photos differently. Also, in following the technique from the first and second video I understood the layering more. In short, instead of using the pencil tool to outline the photos, I used it to reveal the layer of one of the other photos. I feel like my picture turned out better the second time around. There are still some areas where I see the differences in the lighting and more I could work on, but overall I loved doing this and felt really excited when I completed it. I would love to do this again!!

shaunieclonedfinal